

Every Pollywoggles Pattern includes a size chart with the body measurements that were used for each size. Though for some children this will roughly correspond to their age, every child's measurements are as unique as they are, so it is important to measure the child you are sewing for whenever possible. When a child's body measurements fall into different 'sizes' in the chart, the sizes should be blended together for a custom fit. All Pollywoggles patterns also include detailed blending instructions so any level of sewist can achieve the perfect fit!
A Note from Heidi: In 2021, I began expanding the size range of my patterns to include additional tween/teen sizes . You can read a lot more about this on my Blog, but the short version is that my children have always inspired my designs, and as they began to outgrow kids sizes, I wanted to be able to keep sewing my designs for them for a little longer.
Updating patterns from as far back as 2014 is an ongoing process, but as of June 2025, ALL pattern in the Pattern Shop include the expanded size range! There are still some older patterns that haven't yet been updated... some of which are going to remain "retired", and some that I hope to complete the updates to in 2025/2026.


Measuring accurately will help ensure you make the correct size. Pollywoggles patterns use these six basic measurements.
Chest: Keep the tape measure level, under the arms, at the fullest point.
Waist: Measure the narrowest point above the pelvic bones, where the waistband of a pant would naturally sit.
Hips: Measure the fullest part of the hip/seat (sometimes referred to as the "low hip").
Outer Leg: Start where the waistband of a pant would sit, and measure straight down the outside of the leg, stopping at the ankle bone.
Arm Length: Measure from the tip of the shoulder (where a proper fitting shoulder seam would be) to where the wrist and hand meet.
Full Height: Measure against a wall, from the floor to the top of the head.
Download and print these Body Measurement & Size Record Cards!

PDF patterns come with pattern pieces that you will trace and/or cut out in order to construct your garment. One big difference between traditional tissue/paper patterns you purchase in a store and digital pattern pieces, is in the assembly. When printing at home on letter or A4 sized paper, you will have to assemble the pages to create the full-sized pattern pieces that you will use to cut out the fabric for your chosen size. There are many different assembly methods used by various PDF pattern designers, so here is a quick illustration of how to put together Pollywoggles' pattern pages:

The parts of the pattern pieces that extends past the dotted line, will print on both adjacent pages. This means that you may choose to simply overlap them, being sure that the letter/ovals are perfectly matched on top of one another, rather than cutting or folding over. Holding the pages or taping against a bright window can make this very fast and simple, as you can then see very clearly through the page layers.
All Pollywoggles pattern pages will print and be able to be pieced together whether you are printing on 8.5"x11" or A4 paper.
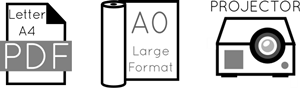
In addition to the convenience of printing and assembling this pattern at home, every Pollywoggles pattern also includes an A0/Large Format PDF, which can be printed at a copy shop for a full-sized master copy of the pattern (ideal for tracing onto pattern paper), as well as a projector-optimized PDF, which eliminates paper entirely by projecting the pattern directly onto a cutting mat.
For more information about paperless sewing, check out the Projectors for Sewing group on Facebook!
Still have questions? Here are a few additional things that you may be wondering about.
If you can't find the answer here, send me an email!