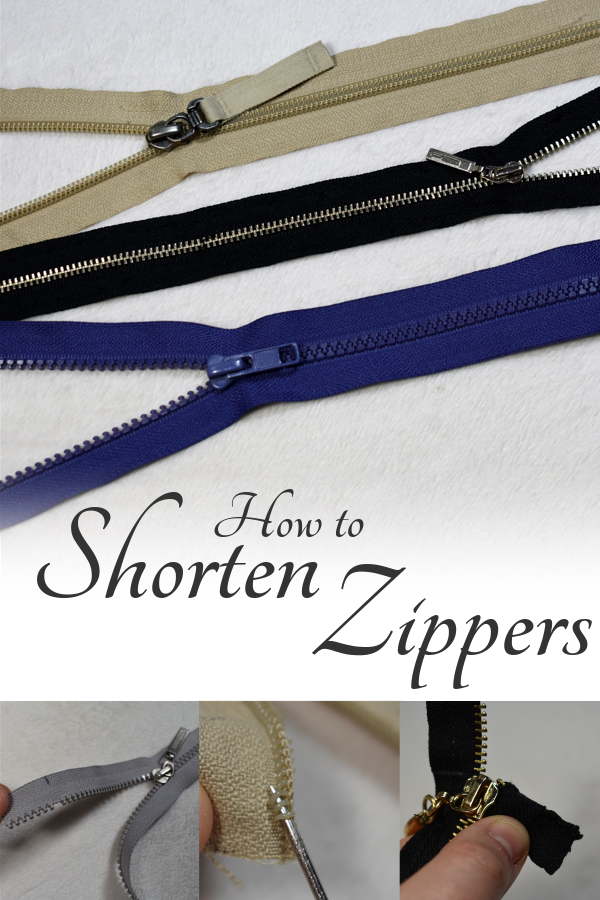
Zzzzip! How to Make Zippers Shorter
2022 Feb 14th
Sewing a pattern that requires a zipper can at times feel daunting. Of all the different fastening options to choose from though, the zipper is in many ways one of the most practical, and is commonly used on garments that are intended for layering or outerwear.
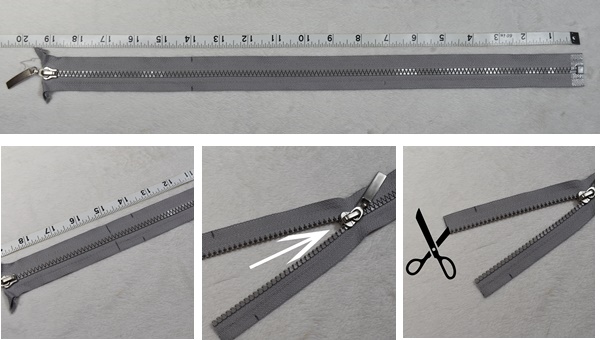
Whether you purchase a zipper from a store or upcycle one from an old garment, it's not uncommon to find that the zipper you have does not match the zipper length that is called for in the pattern. This makes sense, because the design isn't created to fit the zipper... the zipper is the one that has to fit the design! Shortening zippers isn't all that difficult, and all you need are a few basic tools.
First of all, let's break down the parts of a zipper, and some of the different kinds of zippers that are available.
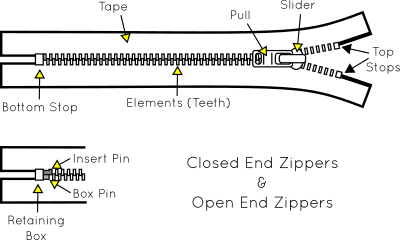
Zippers come in two categories... Closed End and Open End.
Closed End zippers are zippers that have a "stop" at the bottom, meaning that you can zip the zipper open only so far... and then it stops. The two halves of the zipper stay attached together at the stopping end.
An Open End, or Separating, zipper is one that will come apart into two completely separate pieces when the zipper is unzipped all the way. To close these zippers again, you must lower the zipper pull to the very bottom, slide the Insert Pin into the Box that is attached to the other half of the zipper, and then the two halves can be zipped back together again.
There are some fancy variations of zippers within the two categories, including zippers that have zipper Pulls at both ends and can unzip in both directions, and reversible zippers with Pulls that can flip over the top of the Slider so they can be opened from either side.
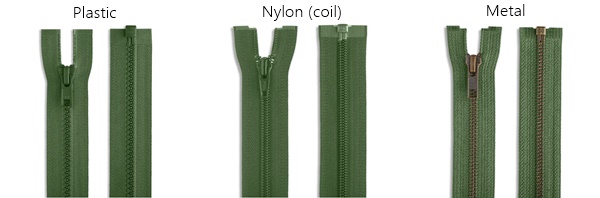
Either of these types of zippers can have different kinds of teeth... plastic, nylon, or metal.
So now that we're familiar with the names for the different parts of a zipper, the two basic categories, and the kinds of teeth a zipper may have... what do you do when you have a pattern that calls for a zipper of a specific length, but you don't have one that is exactly the right size?
Simple... you choose one that is longer, and you shorten it.
Shortening Closed-End Zippers
Shortening closed-end zippers is really easy, so I don't need to spend much time on that.
Regardless of whether the zipper you are using has plastic, nylon, or metal teeth, if you need a shorter Closed-End zipper, it is shortened from the bottom by adding a new Bottom Stop and cutting off any excess.
You can purchase Zipper Stops for this purpose... or you can go the budget-friendly route and make them! All you need is a handstitching needle and thread.
Simply measure the length of zipper that you need (measure from the top stops, down the length of the zipper), and mark the new Stop location. Then, using thread of a coordinating colour, whipstitch tightly several times around the teeth at that location. Once the new Stop is secure, cut off the excess zipper, leaving approximately 1" (2.5cm) of length after the bottom stop. Nylon zippers can be cut right through (not with fabric scissors of course! Use scissors that are general purpose); plastic or metal zippers should be cut in the space between the teeth.
If the remaining teeth on the bottom end of the zipper won't be hidden neatly inside whatever the zipper is being sewn into, or if there is any risk in the case of metal teeth that they might be sewn over, those teeth should be removed. Skip down to the section on Shortening Open-End Zippers to see how the teeth are taken off the ends of the zipper tape.
Shortening Open-End Zippers
The most important difference when shortening a separating zipper, is that they must be shortened from the top. The bottom of Open-End zippers has a special Stop that is called a Retaining Box. This box is what allows the two halves of the zipper to come completely away from each other... and be zipped back together again when needed. This has to remain on the zipper when it is shortened.
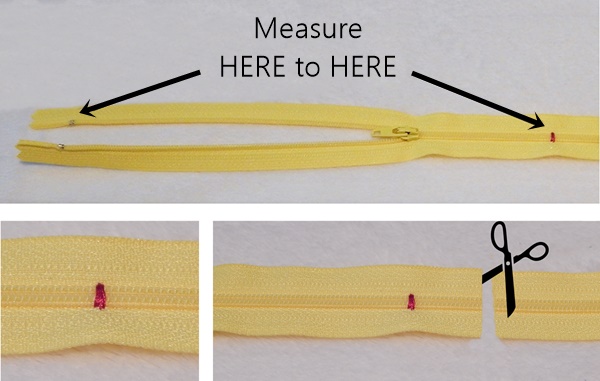
First, with the zipper closed, measure the new length of zipper that is needed. Measure from the Box at the bottom of the zipper, toward the top. Mark the location of the new zipper length. Then, mark 1" (2.5 cm) of extra length.
Slide the zipper pull down past the new length so that the two halves of the zipper are separated where the new length will be made.
Cut off the excess zipper, at the second mark. As mentioned above, nylon zippers can be cut right through (not with fabric scissors of course! Use scissors that are general purpose); plastic or metal zippers should be cut in the space between the teeth.
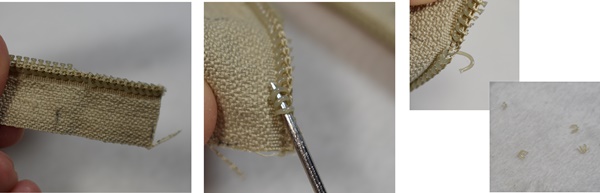
Now things will be a little different, depending on what the teeth are made of.
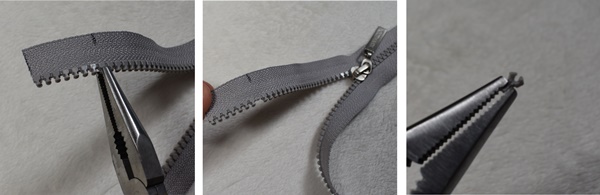
For plastic zippers, I like to first remove the teeth that are directly in line with the new length. Using a pair of pliers, I grip the single tooth and carefully but forcefully work it off the zipper tape. If you have wire cutters that are small enough to first snip off the "nub" of this tooth, it will make getting this first tooth off even easier. You can skip doing this step, but I find that having this one tooth removed first (on each half) is a clear marker of where my new zipper will end up, and I won't accidentally damage more teeth than I intend to.
Shown in the third photo here is what each of these teeth look like when they have been removed.
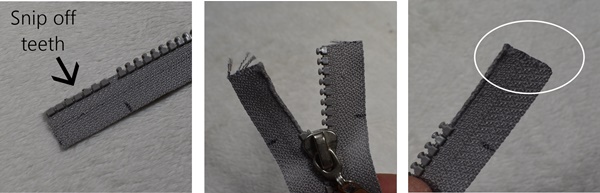
The next step is to snip off the top "nub" from each of the excess teeth. Small wire cutters are good for this purpose, or perhaps a heavy pair of scissors. One advantage of removing those first teeth in the previous step, is that if you are using scissors it makes it much easier to keep the 'good' part of the zipper out of the way when you are cutting.
Once the nubs of the teeth have been removed, use pliers to grab the remaining bits of each tooth and pull them off, first on one side of the zipper tape and then on the other. Cutting off the nubs, makes the remaining connection between both halves of each tooth much weaker, and therefore much easier to pull apart and less likely to damage the edge of the zipper tape.
If the end of the zipper teeth starts to fray, use liquid fray-stop or (if the tape is nylon) the fraying can be stopped by carefully heat-sealing with a small flame. Then add a top Zipper Stop, as detailed a little further on in this post.
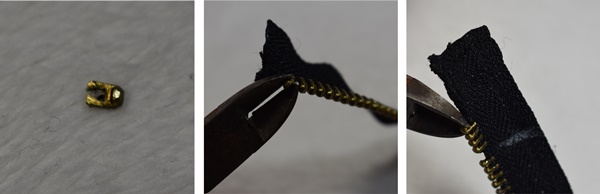
If using a metal zipper, shortening it is very similar to the plastic zipper shown above. The difference is that it's likely to be much more difficult, and perhaps impossible, to snip the nubs from the teeth (depending on the size of the zip, the material it is made from, and how strong the wire cutters are). If you can snip the nubs off the teeth, it will make them easier to remove, but if you can't, it is still possible to remove them one by one.
With metal teeth, it's a good idea to practice removing the ones at the end of the zipper before trying to remove the tooth immediately adjacent to where the new zipper length should be. Once you've got the hang of it, then you can move down to remove that tooth that is lined up with the length mark, before removing all the remaining teeth on the excess length of zipper tape.
Using small pliers, grip the end of one of the metal teeth. Carefully, but forcefully, pry the tooth from the zipper tape by bending it away from the tape until one of the grips of the tooth lets go. Shown here is what each tooth looks like, so you can see how it is gripping and how it needs to be pulled away. Try not to pull the tooth away straight out from the tape because if you do, the edge of the zipper tape will be damaged. Usually the teeth will be slightly easier to release from the side bottom of the tape, so try prying it loose from that side first.
If the tape does end up a little frayed, you may use liquid fray-stop or, if it is nylon tape, carefully heat-seal the edge with a flame. Then add a top Zipper Stop, as detailed a little further on in this post.
The final type of zipper is a nylon (or coil) zipper. These zippers don't have individual teeth, but rather a long filament that is coiled around like a corkscrew. This means that you can't remove them by pulling on the individual teeth, or you'll actually end up pulling the coil itself tighter. If that happens in the section of the zipper that you intend to keep, it will be ruined. So, shortening a nylon zipper involves first cutting off the outside curve of each of the teeth that have to come off.
Using scissors or snips, carefully trim off the curved tips of all the teeth along the section of the zipper that is on the excess length. Cut cautiously, as you don't want to cut into the zipper tape, and it is quite close to the teeth. Once the outer curves of the teeth are trimmed off, the remaining part of each coil has to be removed from where it goes through the zipper tape. With a narrow tool (I use a sharp metal pick, but you can also use a wooden toothpick or even a straight pin), slide under the remaining bits of coil and gently pull them away from the zipper tape. If the tips have been successfully trimmed off, these bits will fall away easily. If the tips were not cleanly cut off, you may have to wiggle or use fine-tipped pliers to grab and pull some of the bits out.
Keep in mind that the very last tooth that was cut off is the end of the continuous coil that makes up the rest of the zipper. Be sure to feel that edge to make sure it's not sticking out too far (which would leave a sharp edge), and trim it off if necessary.
Adding a Top Stop to the Zipper
Now the only thing left to do (for all the zipper types) is to make sure that there is a Stop at the TOP of the zipper. If there isn't... the zipper will zip right past the final teeth... and it will be extremely difficult to get back on.
Again, Top Stops can be purchased, but they are also easy to handstitch with thread.
One method is to whipstitch around or just above the very top teeth. Keep stitching around and around until the thread builds up higher than the tooth so that the zipper can't get past it. This is a good option to use if the top of the zipper will not be at a corner on the item you are sewing it onto.
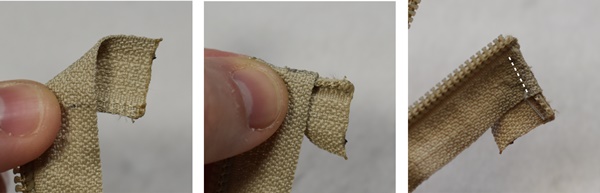
Another method is to first fold the excess zipper tape down at an angle, and then stitch the fold to secure it in place and hold that extra bulk to the top edge. I like using this method because you don't end up with a really visible Stop at the top of the zipper, and I think it makes the nicest finish no matter what I happen to be sewing the zipper to. My preferred way to fold this edge is a "triangle" fold, as shown here; fold the tape over once at 45degrees, then again. This makes a nice 90degree corner at the top edge of the zipper, which is simply stitched in place. As long as this fold is nice and tight to the very top tooth, the zipper pull can't get past it; but for extra security you could also add some extra whipstitches around the very top edge right next to the zipper, just to bulk it up a little more.
And there you have it... three zippers, all made shorter!
I'm sure that there are a lot of other great tips out there for how to shorten these different zipper types. If you have any, I'd love to hear them!